Come amministrare diverse maschere di amministrazione in PaperOffice (Parole chiave, voci di stato, flussi di lavoro, ecc.)?

Katherine Sadowski
Creato: 02.09.2020 10:19 - Aggiornato: 07.09.2020 4:17
Password categories administration
In the administration mask of the password categories you can easily create new categories for your passwords, edit or delete existing ones.
PaperOffice generates predefined entries with every installation, such as "old passwords", "music" or "access data", which you can remove at any time.
Create new entry:
Click on the "Create new entry" button to create a new category for your password management.
Enter the name of your new category under the label "Description [visible]". This designation is displayed when you click on the selection list for the category selection in the password details and is visible to all employees of the network.
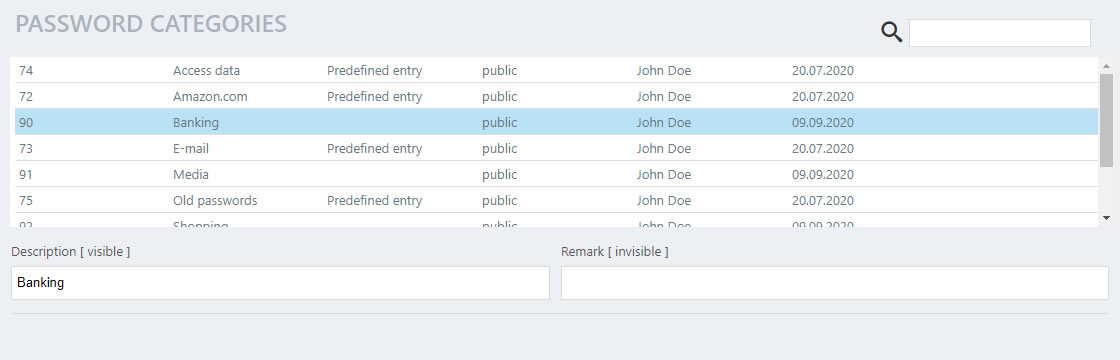
You can optionally save a comment for the password category, this is only visible in the password management mask and is displayed in the table next to the name on the right.
Save your entry by clicking on "Save current entry".

Of course you can cancel the process by clicking on "Cancel", your entry will not be saved.
Delete existing entry:
Select the entry you want to delete and click it in the management table.
Then click on the lower button “Delete selected entry” to delete it and then confirm the security question with “Yes”.
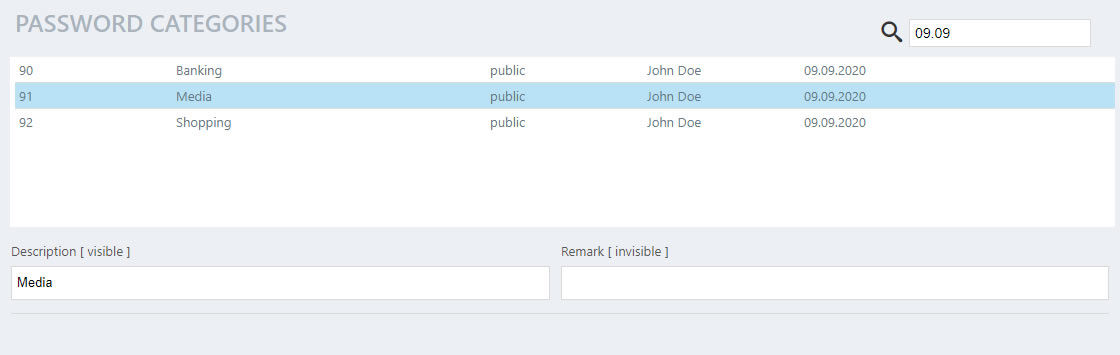
Search for entries:
You can search for entries that have already been created within the administration mask by clicking on the right, next to the lens icon,

enter the term you are looking for. A real time search of your entries is carried out.
The search is carried out for all entry data, such as the description, comment, user name and the date.
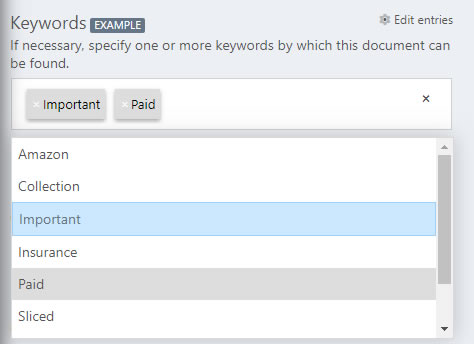
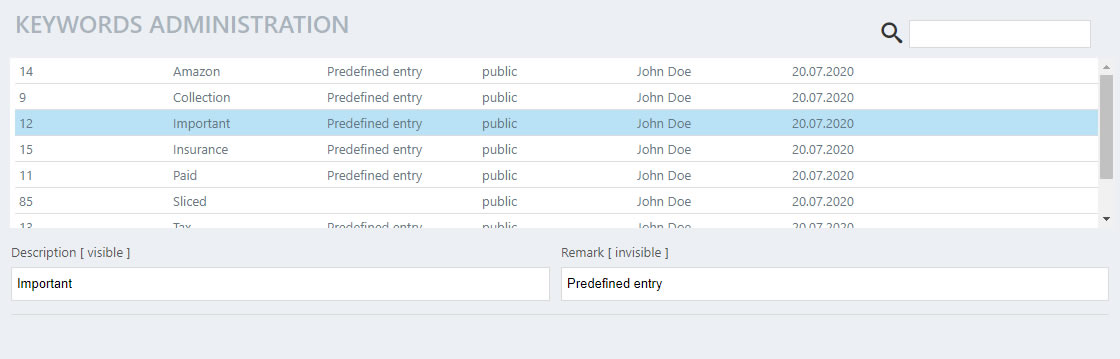
Keywords administration
In the keyword administration mask you can easily create new keywords for your document properties, edit or delete existing ones.
With every installation PaperOffice generates predefined entries such as “Paid”, “Important” or “Insurance”, which you can remove at any time.
Create new entry:
Click the "Create New Entry" button to create a new keyword for your documents.

Enter the name of your new keyword under the label "Description [visible]". This designation appears in your document properties when you click in the selection list and select a keyword and is visible to all employees in the network.
This designation is also displayed in the search under the corresponding column and taken into account in the Excel export from the advanced search.
Optionally, you can store a comment for your keywords; this is only visible in the keywords management mask and is displayed in the table next to the description on the right.
Save your entry by clicking on "Save current entry".
Of course you can cancel the process by clicking on "Cancel", your entry will not be saved.
Delete existing entry:
Select the entry you want to delete and click it in the management table.
Then click on the lower button “Delete selected entry” to delete it and then confirm the security question with “Yes”.
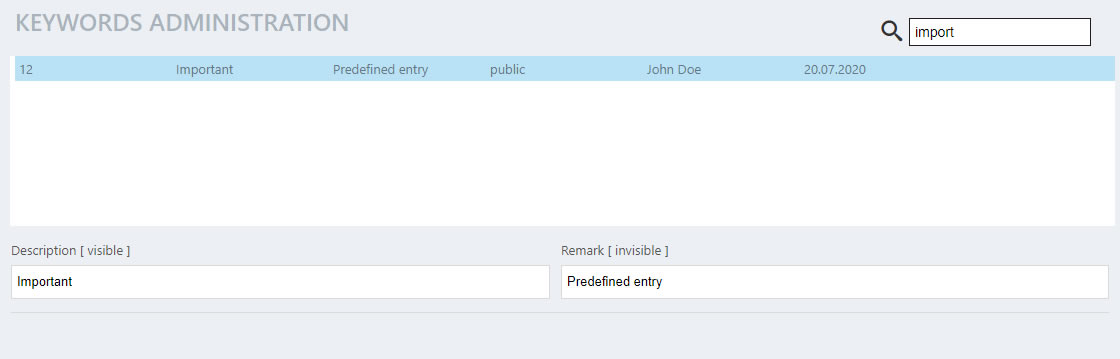
Search for entries:
You can search for entries that have already been created within the administration mask by clicking on the right, next to the lens icon,
enter the term you are looking for. A real time search of your entries is carried out.
The search is carried out for all entry data, such as the description, comment, user name and the date.
Document type administration
You can easily create new document types for your document properties, edit or delete existing ones in the document type administration mask.
With every installation PaperOffice generates predefined entries such as "offer", "order confirmation" or "order", which you can delete at any time.
Create new entry:
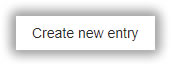
Click on the "Create New Entry" button to create a new document type for your document.
Enter the name of your new document type under the label "Description [visible]". This designation appears in your document properties when you click in the selection list and select a document type and is visible to all employees in the network.

The type is displayed in the corresponding entry in the document list.
This designation is also displayed in the search under the corresponding column and taken into account in the Excel export from the advanced search.
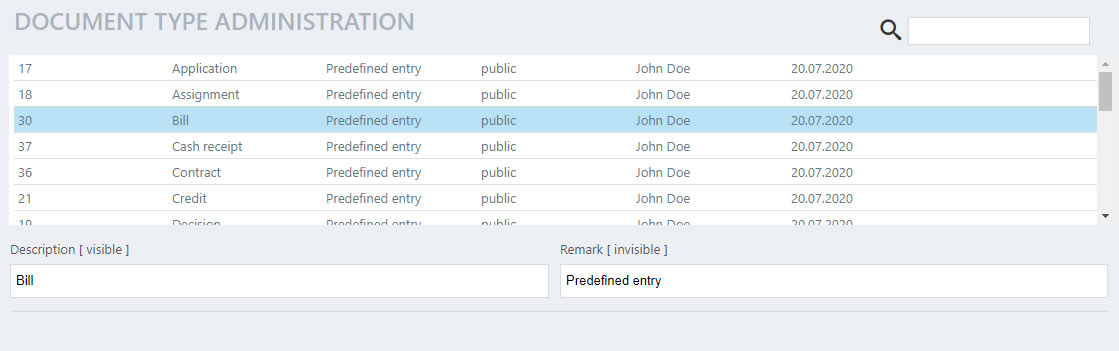
You can optionally store a comment for your document types; this is only visible in the document type administration mask and is displayed in the table next to the description on the right.
Save your entry by clicking on "Save current entry".
Of course you can cancel the process by clicking on "Cancel", your entry will not be saved.
Delete existing entry:
Select the entry you want to delete and click it in the management table.
Then click on the lower button “Delete selected entry” to delete it and then confirm the security question with “Yes”.
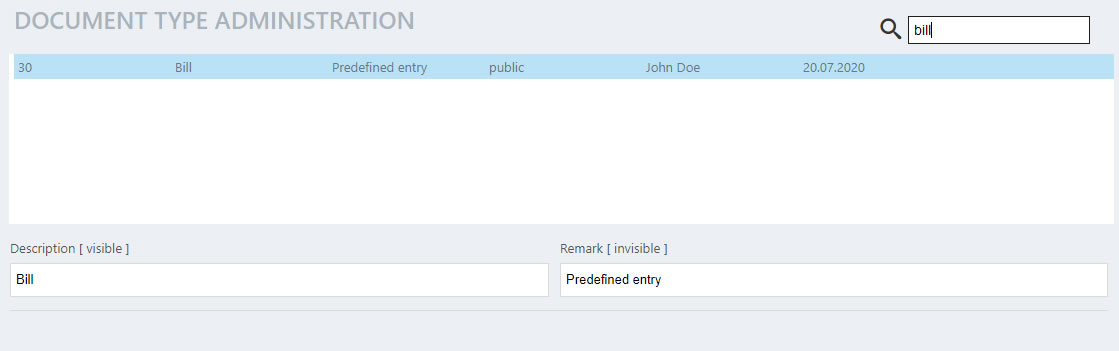
Search for entries:
You can search for entries that have already been created within the administration mask by clicking on the right, next to the lens icon,
enter the term you are looking for. A real time search of your entries is carried out.
The search is carried out for all entry data, such as the description, comment, user name and the date.
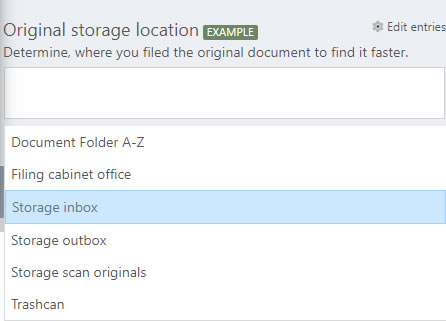
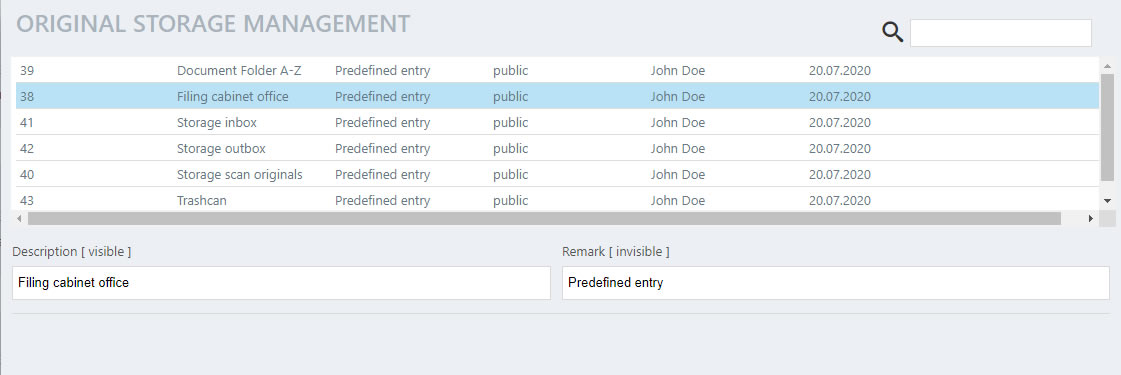
Original storage locations management
In the management mask for the original storage locations system, you can easily create new locations in the original storage locations systems for your document properties, edit or delete existing ones.
PaperOffice generates predefined entries with every installation, such as "Inbox storage", "Office storage cabinet" or "Document folder A-Z", which you can remove at any time.
Create new entry:
Click the "Create New Entry" button to create a new location for your document in the original storage locations system.
Enter the name of your new original storage locations under the label "Description [visible]". This designation appears in your document properties when you click in the selection list and select an original storage area and is visible to all employees in the network.
This designation is also displayed in the search under the corresponding column and taken into account in the Excel export from the advanced search.
Optionally, you can store a comment for your original storage locations, this is only visible in the original filing management mask and is displayed in the table next to the description on the right.
Save your entry by clicking on "Save current entry".
Of course you can cancel the process by clicking on "Cancel", your entry will not be saved.
Delete existing entry:
Select the entry you want to delete and click it in the management table.
Then click on the lower button “Delete selected entry” to delete it and then confirm the security question with “Yes”.
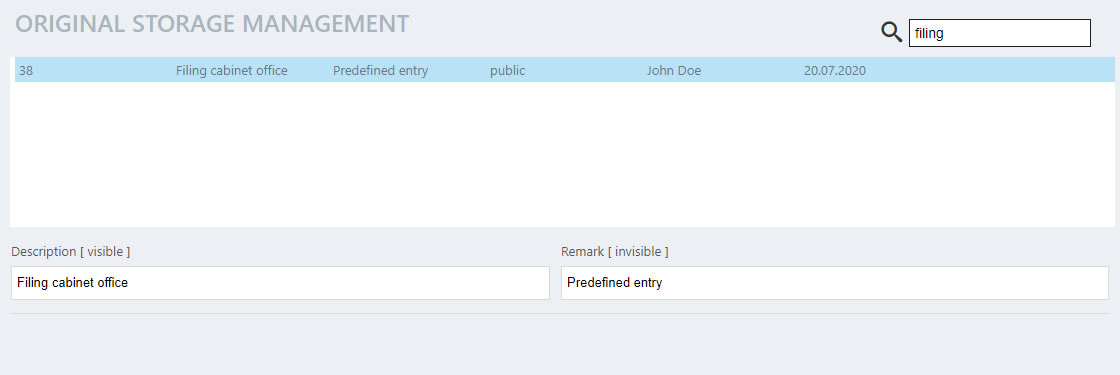
Search for entries:
You can search for entries that have already been created within the administration mask by clicking on the right, next to the lens icon,
enter the term you are looking for. A real time search of your entries is carried out.
The search is carried out for all entry data, such as the description, comment, user name and the date.
Document status management
In the administration mask of the document status entries you can easily create new status entries for your document properties, edit or delete existing ones.
With every installation PaperOffice generates predefined entries such as "Under review", "Paid" or "Must be checked", which you can remove at any time.
Create new entry:
Click on the "Create new entry" button to create a new status entry for your document.
Enter the name of your new status entry under the label "Description [visible]". This designation appears in your document properties when you click in the selection list and select a document status and is visible to all employees in the network.
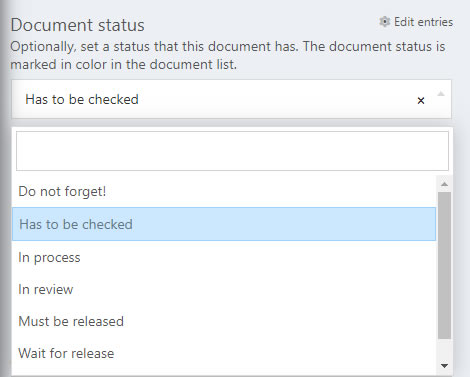
Status entries are used to make your documents in the document list even more informative and to make various document properties recognizable in color, as well as for future searches and the filter setting according to the status.
For example, you can assign the status "not paid" and the color red for your incoming invoices and the color green for "paid". Accordingly, next to the document entry "Invoice XYZ" in the main view, the bar changes from gray to red or green by default, depending on the status of the document, and you get an overview of all your unpaid or already paid invoices at a glance.
This designation is also displayed in the search under the corresponding column and taken into account in the Excel export from the advanced search.
You can optionally save a comment for your status entries; this is only visible in this administration mask and is displayed in the table next to the description on the right.
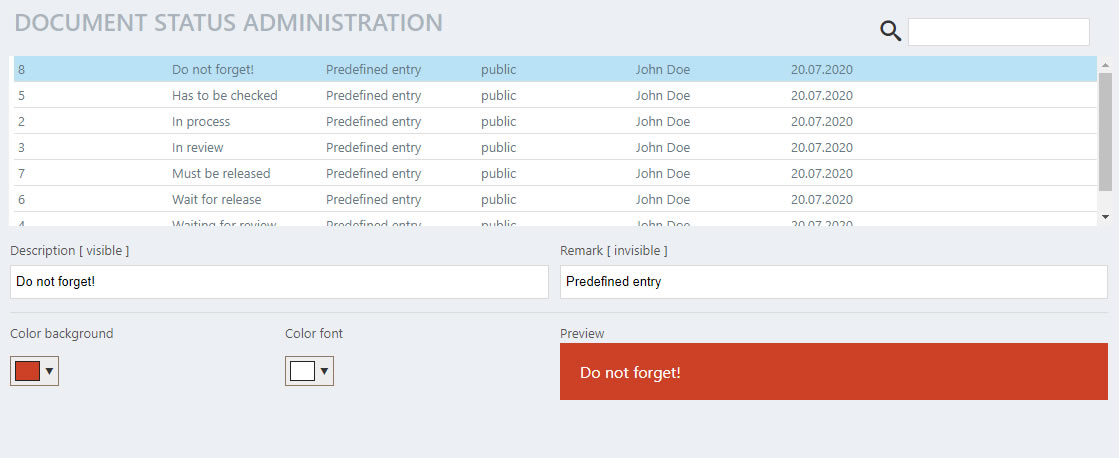
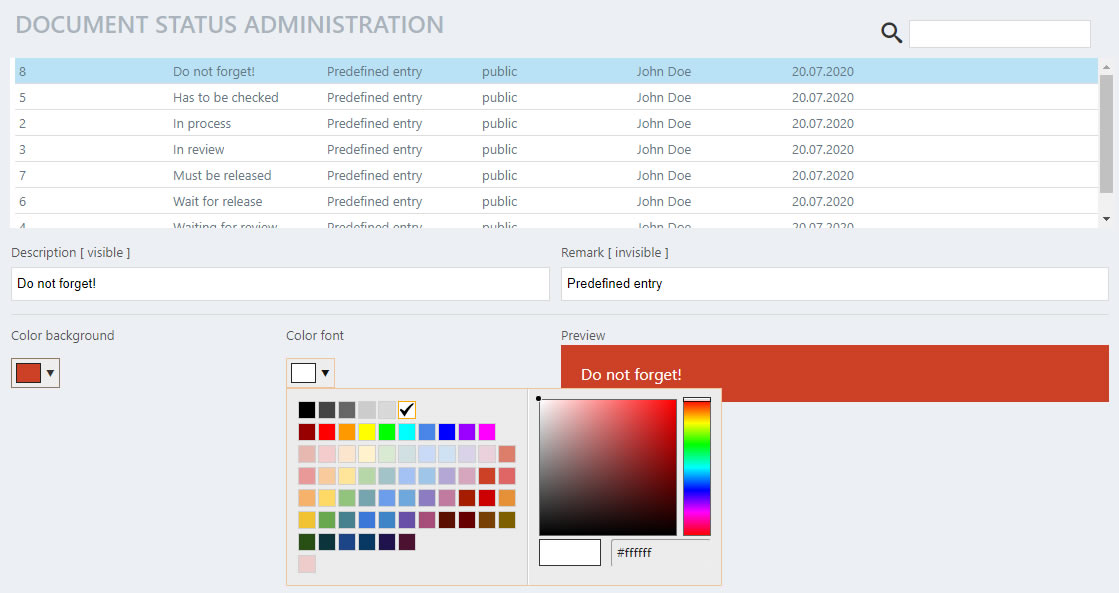
Choose background color:
In the next step, select the background color of your status entry by left-clicking on the colored square under the designation "Background color" and in the next step select any color from the color palette by clicking on it with the left mouse button.
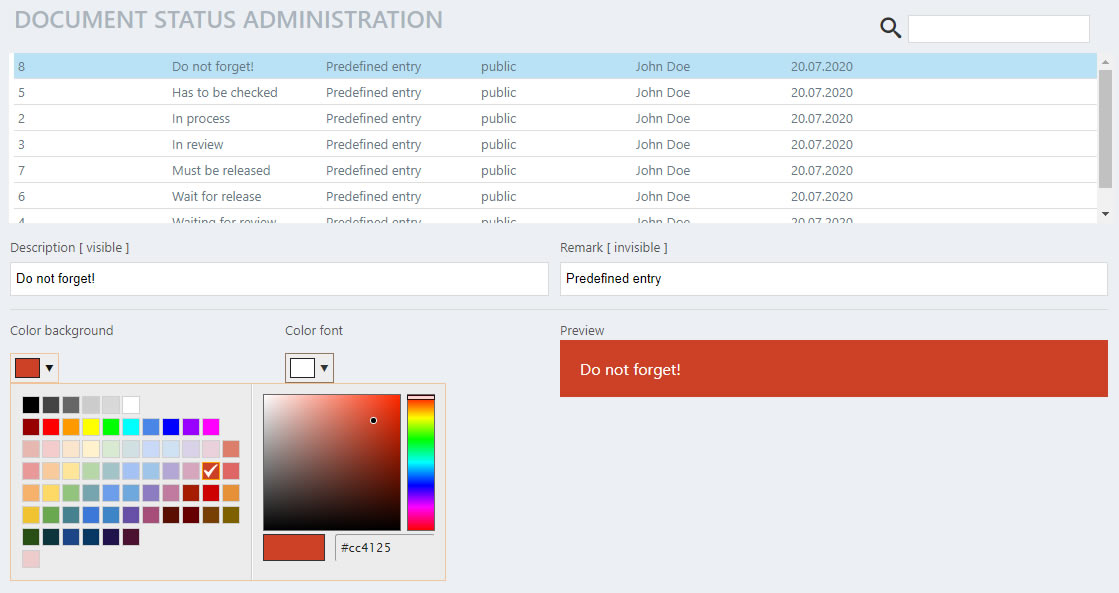
Select font color:
In the next step, select the font color of your status entry by left-clicking on the colored square under the designation "Font color" and in the next step select any color from the color palette by clicking it with the left mouse button.
Save your entry by clicking on "Save current entry".
Of course you can cancel the process by clicking on "Cancel", your entry will not be saved.
Delete existing entry:
Select the entry you want to delete and click on it in the management table.
Then click on the lower button "Delete selected entry" to delete it and then confirm the security question with "Yes, delete and remove".
Search for entries:
You can search for entries that have already been created within the administration mask by clicking on the right, next to the lens icon,
enter the term you are looking for. A live search of your entries is carried out.
The search is carried out for all entry data, such as the description, comment, user name and the date.
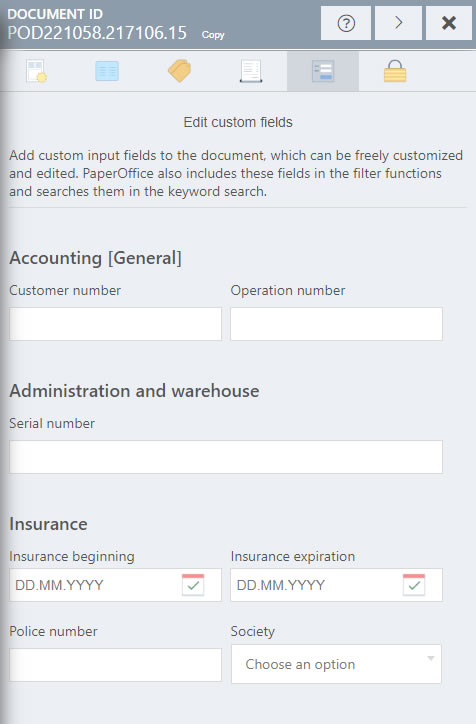
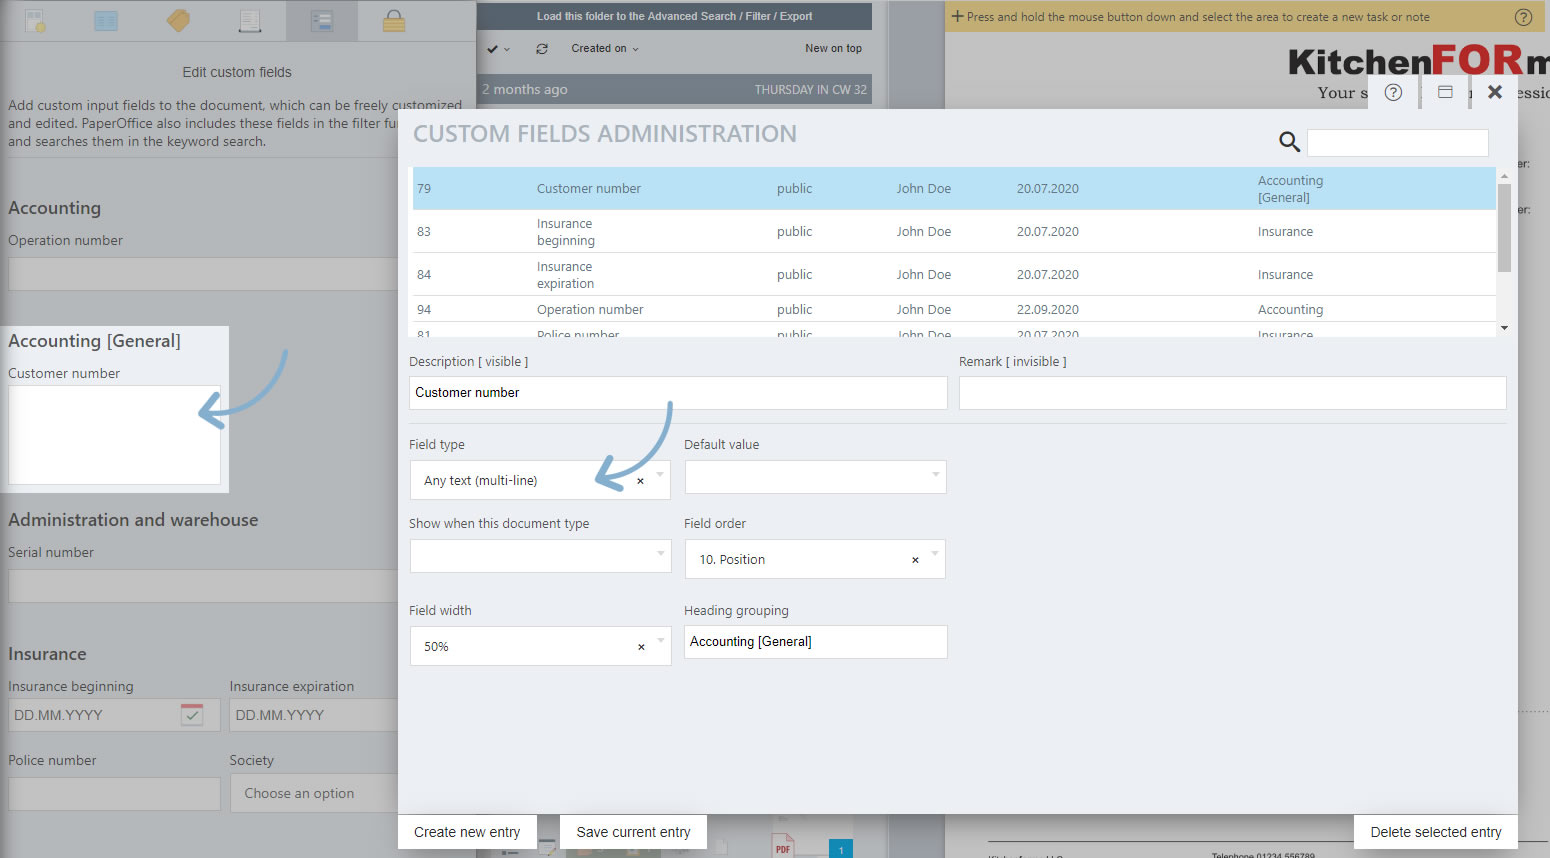
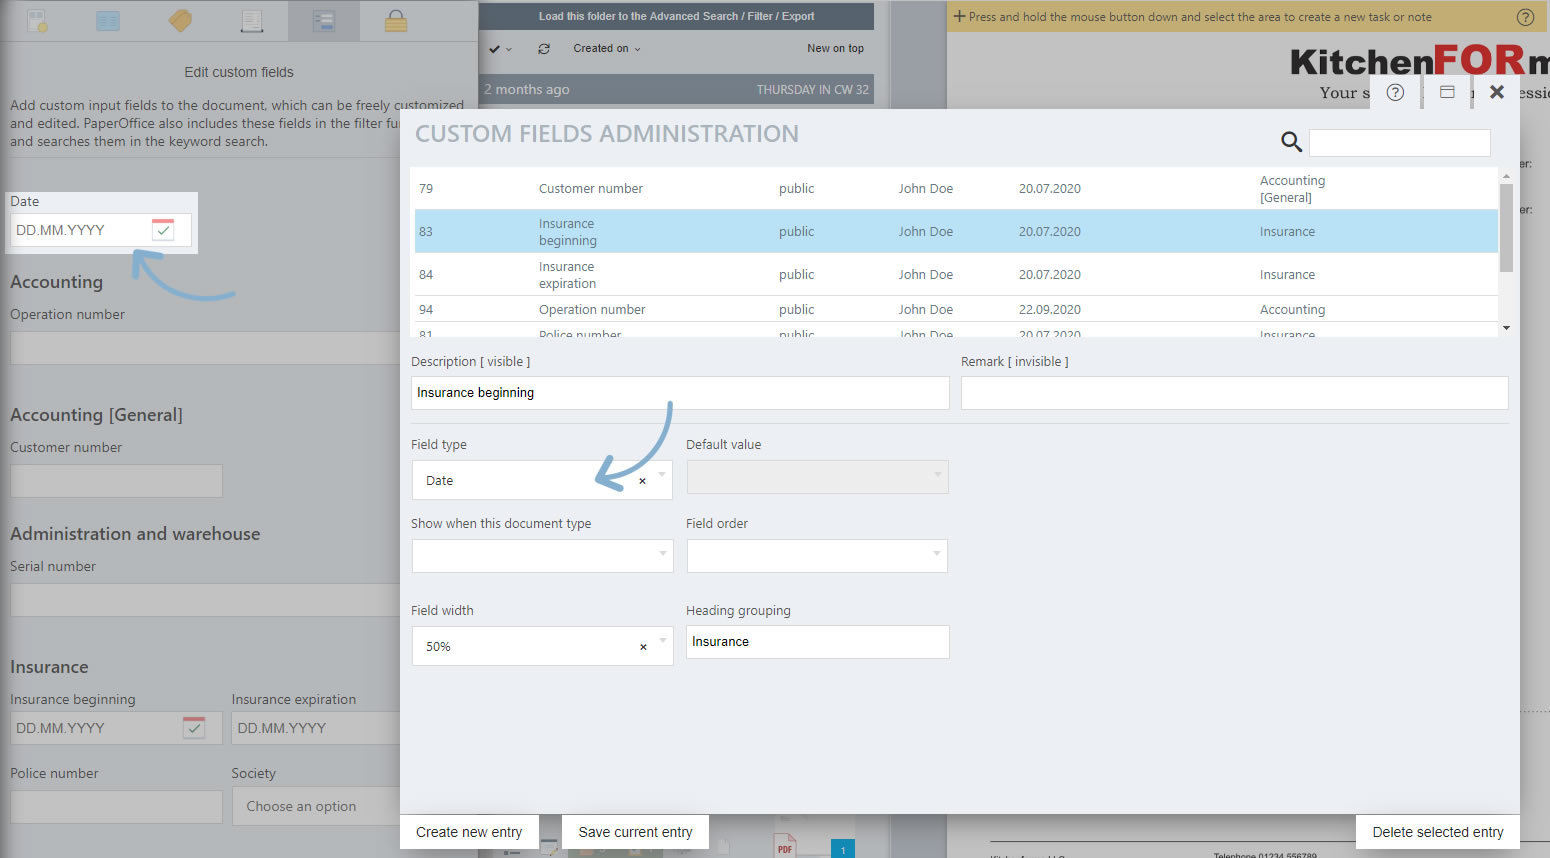
Custom fields management
In the administration mask of the user-defined fields you can easily create new entries for your document properties, edit or delete existing ones.
The user-defined fields allow maximum customization options for your documents. In this way, completely different user-defined fields can be added, which are not available by default for the keywording.
Each newly created user-defined field can be dynamically loaded into the document. This can be done at any time while editing and the document does not have to be reloaded.
PaperOffice generates predefined entries with each installation, such as "customer number", "serial number" or "process number", which you can remove at any time.
Create a new entry:
Click the "Create New Entry" button to create a new custom field for your document.
Enter the name of your new field under the label "Description [visible]". To do this, select the "Grouping heading" to make the entry more visible.
Optionally, you can store a comment for your user-defined fields, this is only visible in this administration mask and is displayed in the table next to the description on the right.
Select field type
Click in the selection list to select the field type.
Any text (single line): Adds a single line input field.
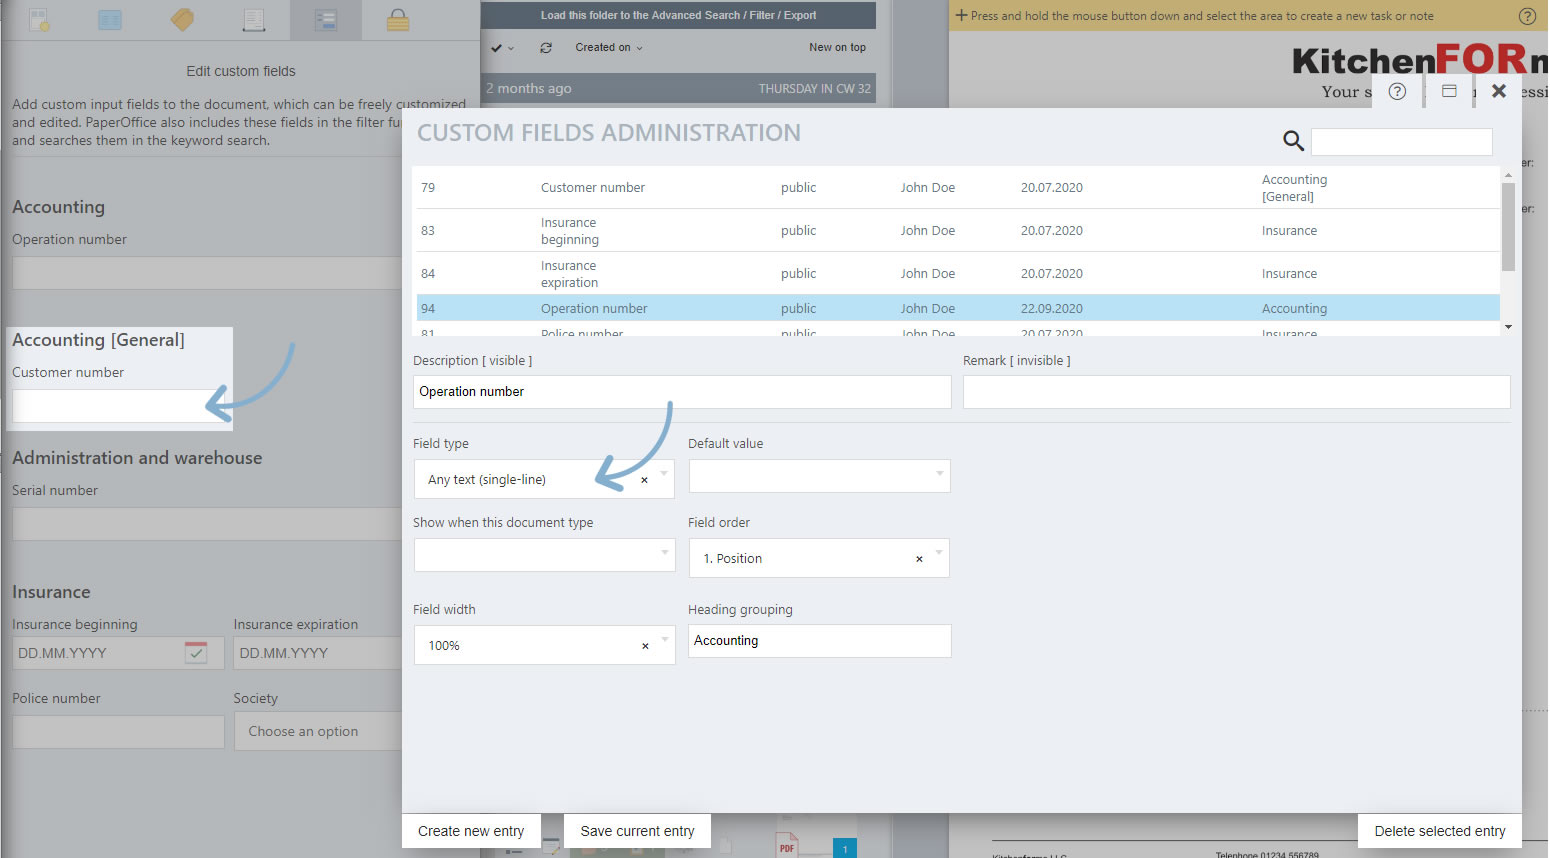
It is very suitable for entering any type of number, such as customer number, policy number, transaction number, etc. if only 1 line is required for entry.
Any text (multiline): Adds a multiline input field.
A white box will be created so you can add more information.
It looks e.g. like this:
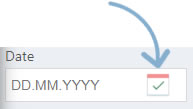
Date
Filling in a custom field of this type will open a calendar so you can simply select a date.
It looks e.g. like this:
Click on the calendar symbol and enter the current date in the corresponding field.
User group administration
You can easily create new user groups, edit or delete existing ones in the user group administration mask.
The Admin entry is already predefined and cannot be changed.
The user groups open up maximum customization options for the distribution of rights to your users.
Create a new entry:
Click on the "Create new entry" button to create a new user group.
Enter the name for your new user group under the label "Name [visible]".
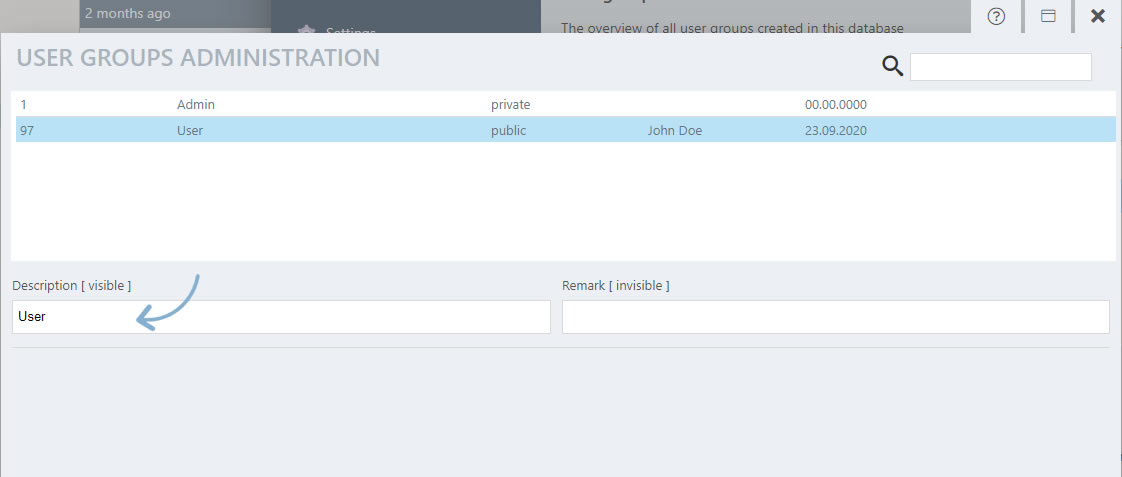
You can optionally save a comment for your user group; this is visible in the administration mask as well as in the user group table.
Only the name of the user group is created in the administration mask, the distribution and assignment of rights takes place afterwards. This is explained in a separate Topic .After the description and, if applicable, the comment have been saved, click on the "Save current entry" button to save the entries.
Edit existing entries:
Select an entry from the list and click on it with the left mouse button. Edit this and then click on "Save current entry".
Search for entries:
You can search for entries that have already been created within the administration mask by clicking on the right, next to the lens icon,
Enter the term you are looking for. A live search of your entries is carried out.
Now exit the administration mask by clicking on "X".
Department administration
In the administration mask of the departments you can easily create new departments, edit or delete existing ones.
Create a new entry:
Click on the "Create new entry" button to create a new department.
Enter the name of your new department under the label "Name [visible]".
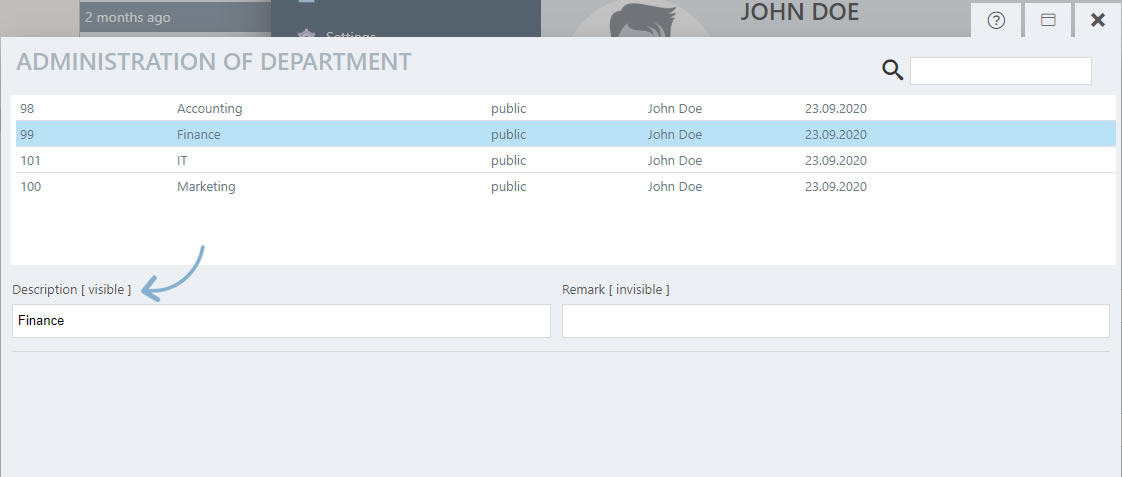
You can optionally save a comment for your department, this is only visible in this administration mask and is displayed in the table next to the name on the right.
After the description and, if applicable, the comment have been saved, click on the "Save current entry" button to save the entries.
Edit existing entries:
Select an entry from the list and click on it with the left mouse button. Edit this and then click on "Save current entry".
Search for entries:
You can search for entries that have already been created within the administration mask by clicking on the right, next to the lens icon,
Enter the term you are looking for. A live search of your entries will be carried out.
Now exit the administration mask by clicking on "X".
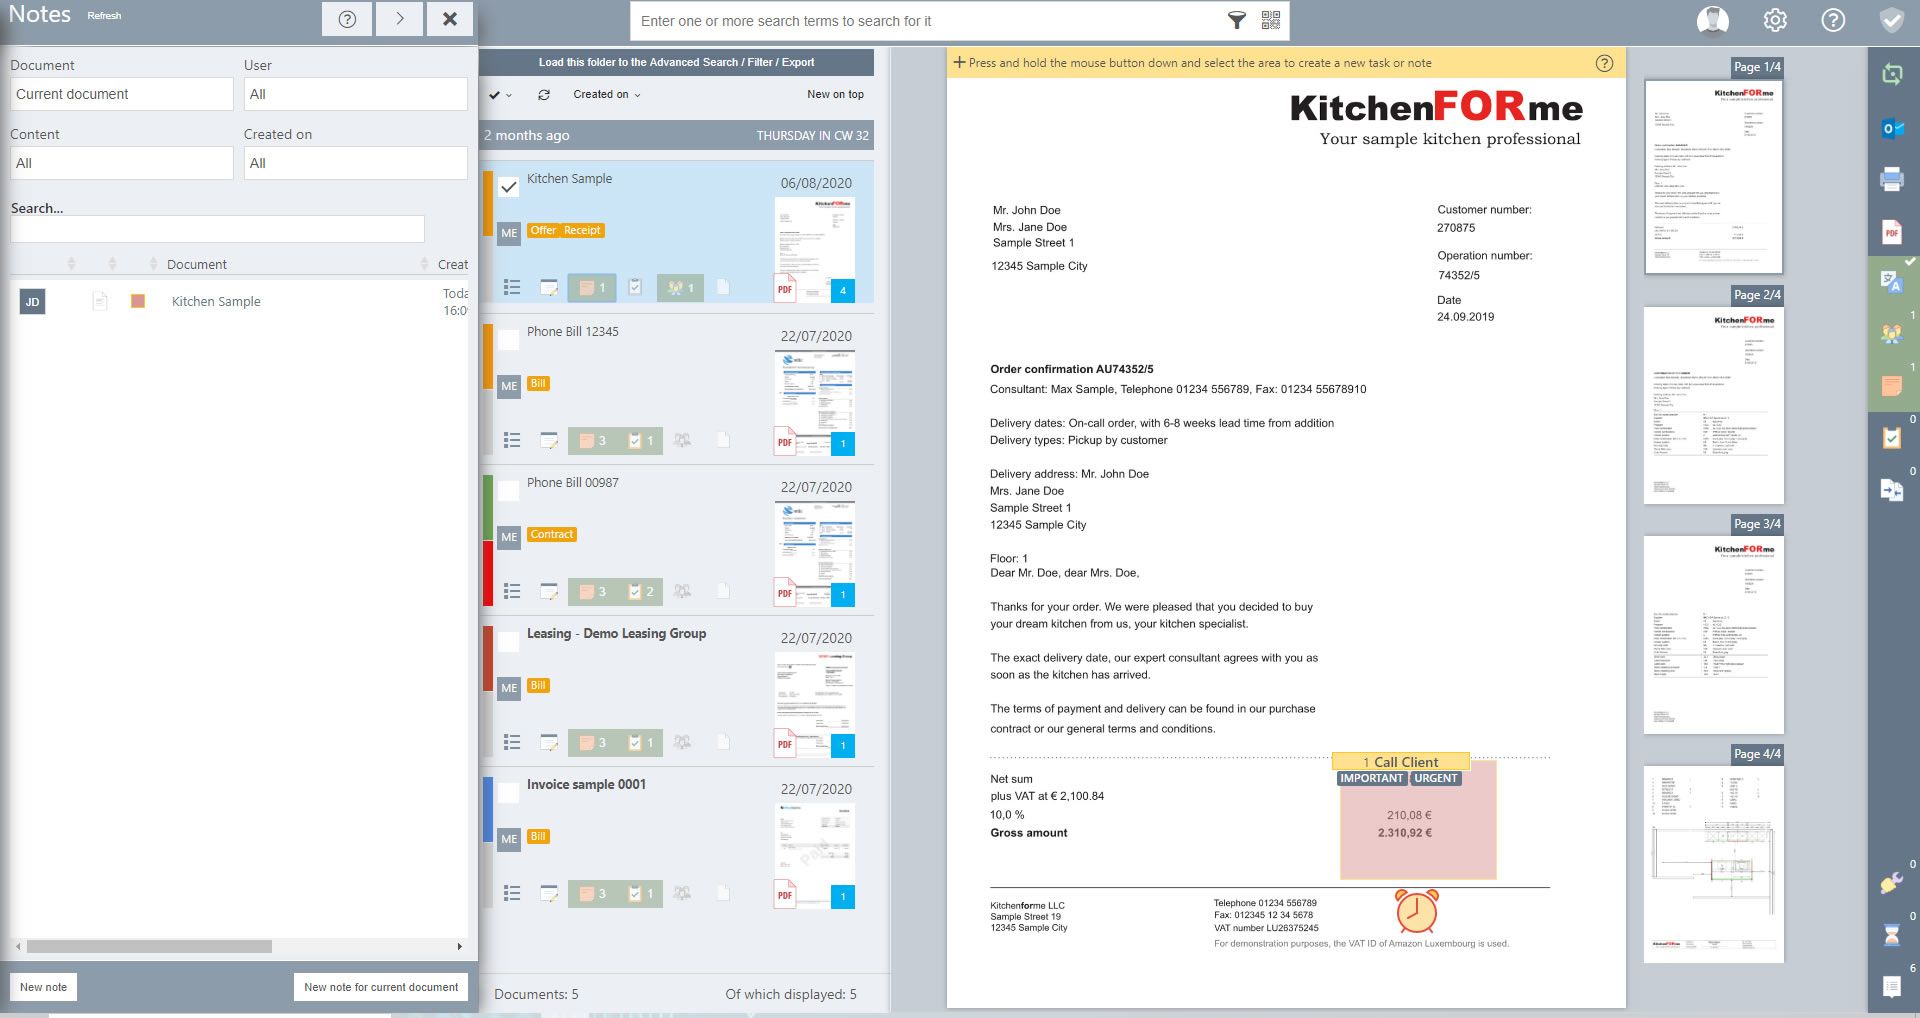
Note keywords management
You can easily create new keywords for your notes, edit or delete existing ones in the management mask for the keywords for notes. Please do not confuse the general keywords for documents and those for notes.
In this way, keywords for notes are displayed in the note square on the document and you can see at a glance whether the note is e.g. is urgent.
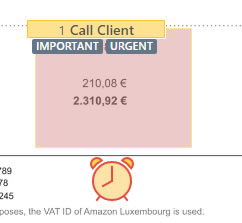
Notes are displayed in the document preview.
Create a new entry:
Click on the "Create new entry" button to create a new keyword for your documents.
Enter the name of your new keyword under the label "Description [visible]". This designation appears later in the selection list of the keywords and is visible to all employees of the network.
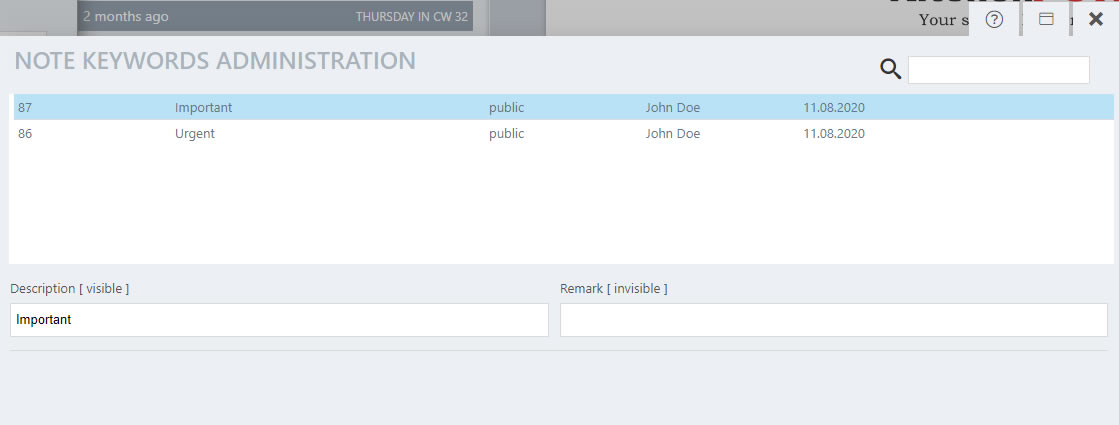
You can optionally store a comment for your keywords, this is only visible in the keyword management mask and is displayed in the table next to the description on the right.
Save your entry by clicking on "Save current entry".
Of course you can cancel the process by clicking on "Cancel", your entry will not be saved.
Delete existing entry:
Select the entry you want to delete and click on it in the management table.
Then click on the lower button "Delete selected entry" to delete it and then confirm the security question with "Yes, delete and remove".
Search for entries:
You can search for entries that have already been created within the administration mask by clicking on the right, next to the lens icon,
enter the term you are looking for. A live search of your entries will be carried out.
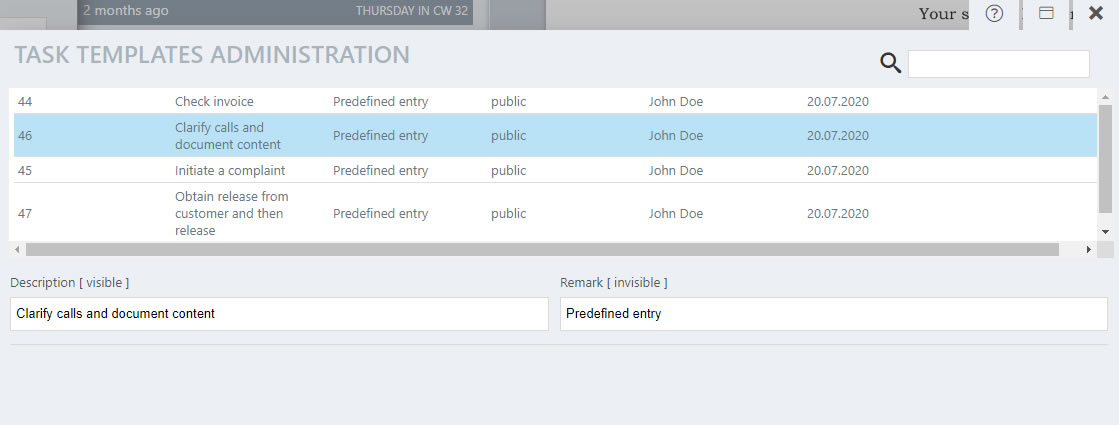
Task template administration
In the administration mask of the task templates you can easily create new task templates for your tasks, edit or delete existing ones.
Task templates are very helpful for recurring tasks. These can be predefined in key points and then easily selected from the selection list.
Create a new entry:
Click on the "Create new entry" button to create a new task template.
Enter the name of your new department under the label "Name [visible]".
You can optionally save a comment for your task template, this is only visible in this administration mask and is displayed in the table next to the description on the right.
After the description and, if applicable, the comment have been saved, click on the "Save current entry" button to save the entries.
Edit existing entries:
Select an entry from the list and click on it with the left mouse button. Edit this and then click on "Save current entry".
Search for entries:
You can search for entries that have already been created within the administration mask by clicking on the right, next to the lens icon,
Enter the term you are looking for. A live search of your entries will be carried out.
Now exit the administration mask by clicking on "X".
Task category administration
In the administration mask of the task categories you can easily create new categories for your tasks, edit or delete existing ones. So you can create task categories according to the processes that are specific to your company.
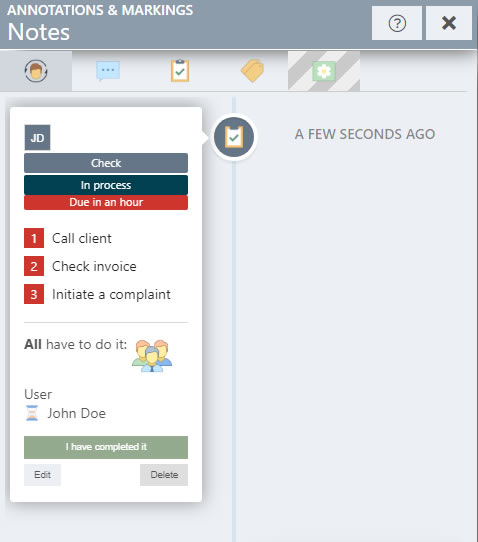
Task categories are displayed in the history above the task description and can be easily configured by you. In this way, you will be informed at a glance what exactly the task is about.
Create a new entry:
Click on the "Create new entry" button to create a new task category.
Enter the name for your new task category under the label "Name [visible]".

You can optionally save a comment for your task category, this is only visible in this administration mask and is displayed in the table next to the description on the right.
After the description and, if applicable, the comment have been saved, click on the "Save current entry" button to save the entries.
Edit existing entries:
Select an entry from the list and click on it with the left mouse button. Edit this and then click on "Save current entry".
Search for entries:
You can search for entries that have already been created within the administration mask by clicking on the right, next to the lens icon,
Enter the term you are looking for. A live search of your entries will be carried out.
Now exit the administration mask by clicking on "X".
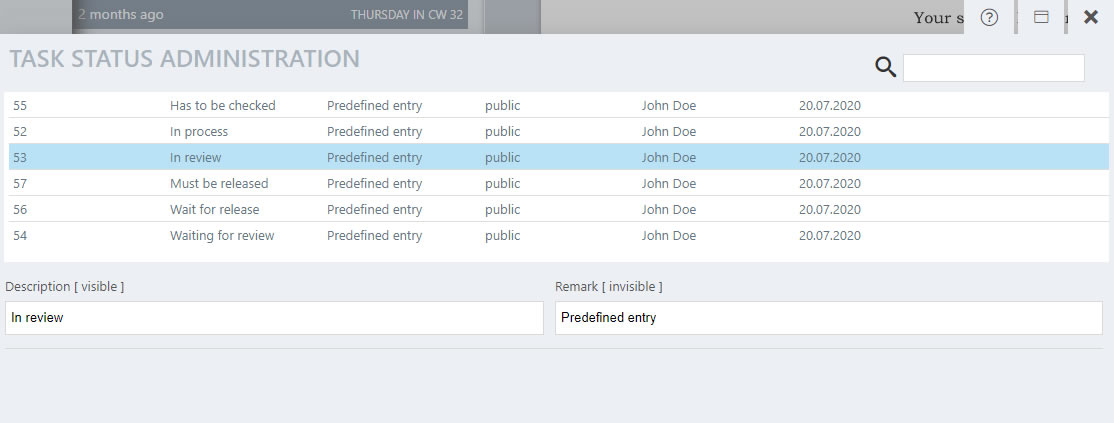
Task status administration
In the administration mask you can easily create new status entries for your tasks, edit or delete existing ones. You can change the status entries at any time during the course of the task.
In this way, workflows can be created and later displayed according to status entries.
Task statuses are displayed in the history above the task description and can be easily configured by you. This way you are informed at a glance about the current status of the current task.
Create a new entry:
Click on the "Create new entry" button to create a new status entry.
Enter the name of your new status entry under the label "Description [visible]".
You can optionally save a comment for your status entries, this is only visible in this administration mask and is displayed in the table next to the description on the right.
After the description and, if applicable, the comment have been saved, click on the "Save current entry" button to save the entries.
Edit existing entries:
Select an entry from the list and click on it with the left mouse button. Edit this and then click on "Save current entry".
Search for entries:
You can search for entries that have already been created within the administration mask by clicking on the right, next to the lens icon,
Enter the term you are looking for. A live search of your entries will be carried out.
Now exit the administration mask by clicking on "X".
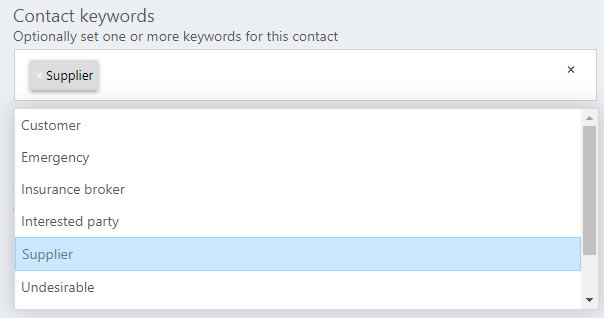
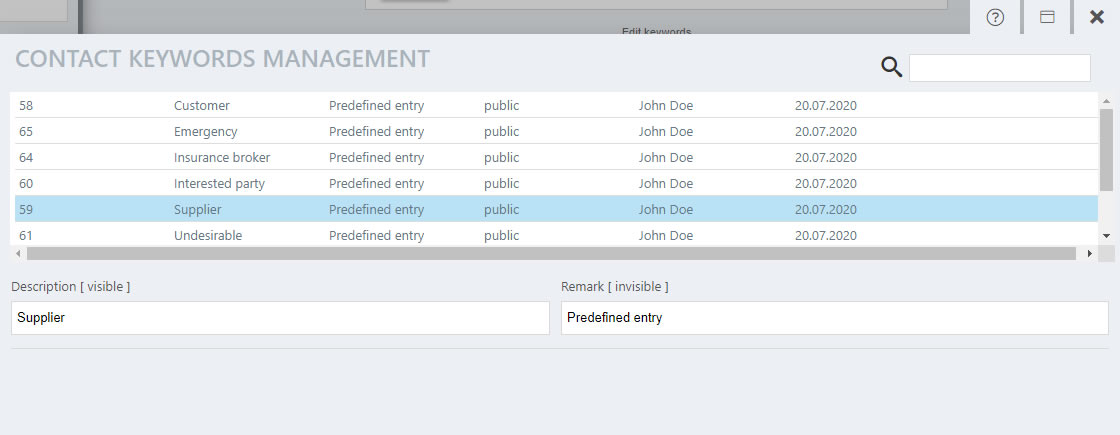
Contact keywords management
In the keyword administration mask you can easily create new keywords for your contacts, edit or delete existing ones.
PaperOffice generates predefined entries such as "Supplier", "Emergency" or "Insurance broker", which you can remove at any time.
Create a new entry:
Click on the "Create New Entry" button to create a new keyword for your contacts.
Enter the name of your new keyword under the label "Description [visible]". This name appears in the administration mask and in the selection list for filtering the contact view.
Optionally, you can store a comment for your keywords; this is only visible in the keywords management mask and is displayed in the table next to the description on the right.
Save your entry by clicking on "Save current entry".
Of course you can cancel the process by clicking on "Cancel", your entry will not be saved.
Delete existing entry:
Select the entry you want to delete and click on it in the management table.
Then click on the lower button "Delete selected entry" to delete it and then confirm the security question with "Yes, delete and remove".
Search for entries:
You can search for entries that have already been created within the administration mask by clicking on the right, next to the lens icon,
Enter the term you are looking for. A live search of your entries will be carried out.
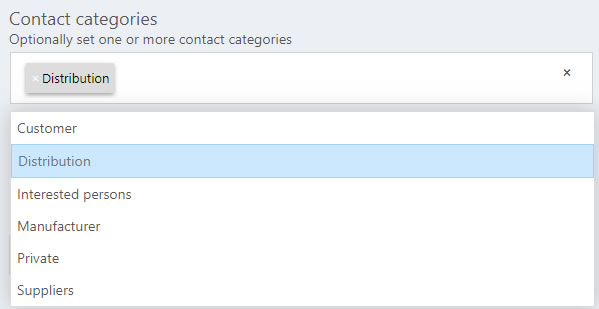
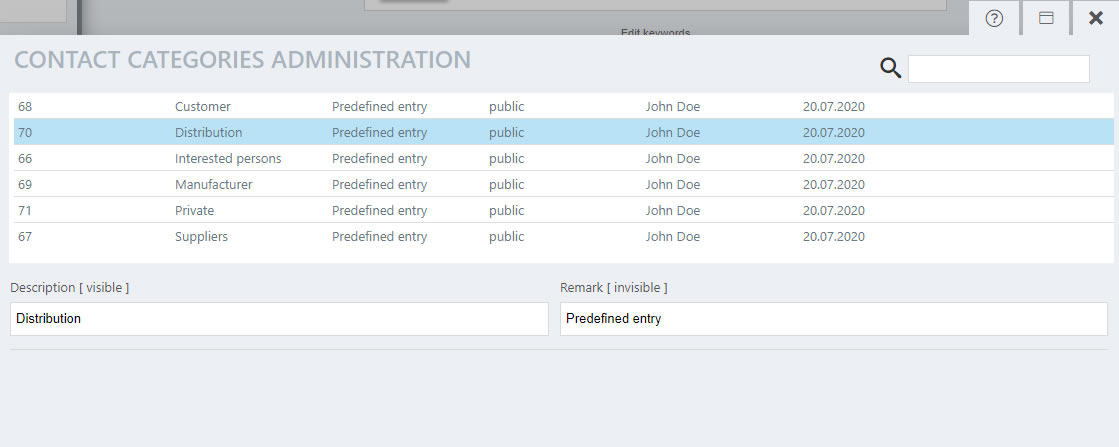
Contact categories management
In the contact categories administration mask, you can easily create new categories for your contacts, edit or delete existing ones.
PaperOffice generates predefined entries such as "Distribution", "Manufacturer" or "Private", which you can remove at any time.
Create a new entry:
Click on the "Create New Entry" button to create a new keyword for your contacts.
Enter the name of your new category under the label "Name [visible]". This name appears in the administration mask and in the selection list for filtering the contact view.
You can optionally save a comment for your categories, this is only visible in the category administration mask and is displayed in the table next to the description on the right.
Save your entry by clicking on "Save current entry".
Of course you can cancel the process by clicking on "Cancel", your entry will not be saved.
Delete existing entry:
Select the entry you want to delete and click on it in the management table.
Then click on the lower button "Delete selected entry" to delete it and then confirm the security question with "Yes, delete and remove".
Search for entries:
You can search for entries that have already been created within the administration mask by clicking on the right, next to the lens icon,
Enter the term you are looking for. A live search of your entries will be carried out.
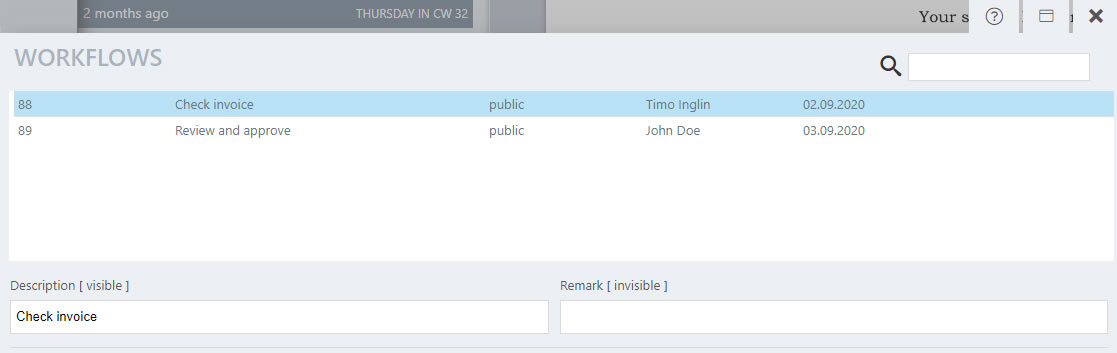
Workflow administration
In the administration mask you can easily create new workflows, edit or delete existing ones.
Create a new entry:
Click on the "Create new entry" button to create a new workflow.
Enter the name of your new workflow under the label "Description [visible]". This designation is displayed when you click on the selection list for the workflow selection in the document properties and is visible to all employees in the network.
You can optionally save a comment for your workflow, this is only visible in this administration mask and is displayed in the table next to the description on the right.
Work instructions:
Save the work instructions for this workflow under the first tab "Work instructions". This work instruction is displayed as soon as the document is called up. Many tools for upper and lower case, underlining and listing are available for you.
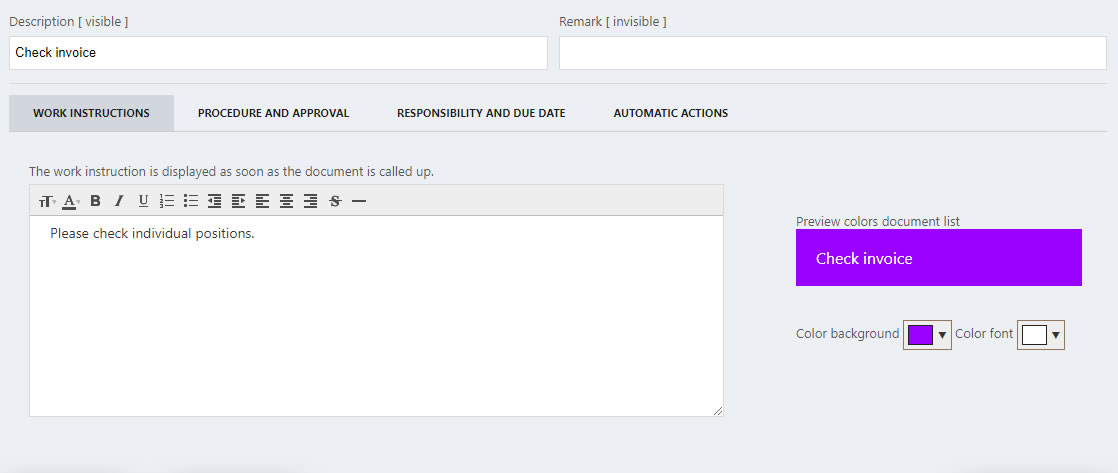
Preview colors document list
On the right-hand side of the work instruction, you can define the background color and the font color that should appear in the document list. This is very helpful to recognize at first glance within the PaperOffice interface if workflows have been assigned to a document and what description they have.
To do this, click on the color palette next to the corresponding description and select the corresponding color in the next step.
Procedure and approval:
Define the course of your workflow under the tab "Process and Approval". You have two options here:
1. Request red-green decision and forward it to further workflow
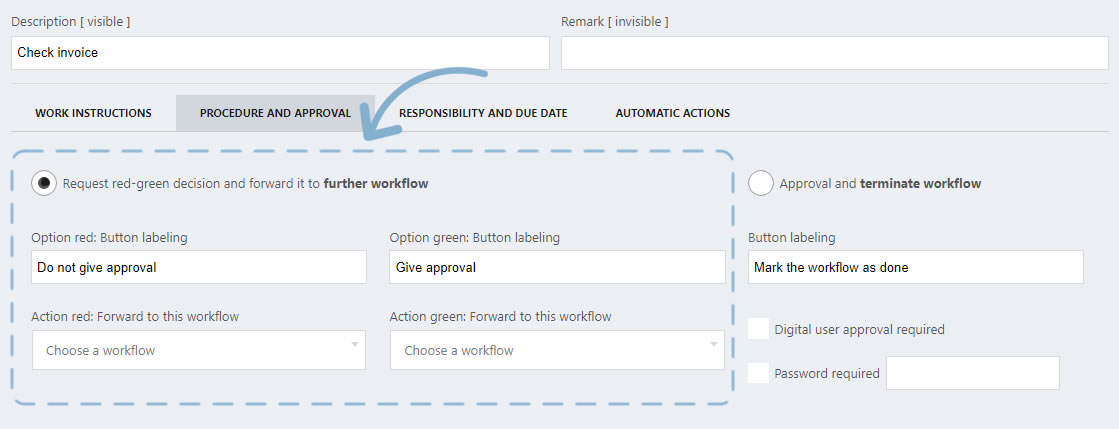
The red-green decision means that the future workflow dialog will have a right-wrong query. Using the example of an invoice verification, this can be correct (then it is released) or has to be corrected (then it is forwarded to another department for correction).
Option red: Labeling button
Leave a label for the button with a negative decision. For example, the invoice is incorrect and “needs to be changed”.
Action red: Forward to this workflow
Here you can define another workflow. The current workflow will be forwarded to them if a negative decision is made.
Left-click in the selection list and select an existing workflow.
Option green: Labeling button
Leave a label for the button with a positive decision. For example, that the invoice is correct and can be approved.
Action green: Forward to this workflow
Here you can define another workflow. The current workflow will be forwarded to them if a positive decision is made.
Left-click in the selection list and select an existing workflow.
2. Approval and End workflow
Labeling button
Leave a label for the button with a positive decision. For example, that the invoice is correct and can be approved.
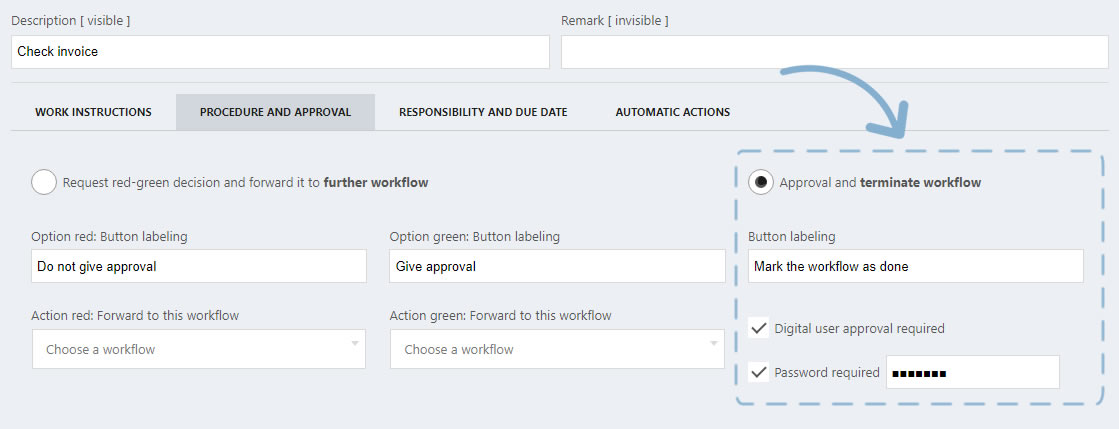
Digital user approval required
Put a check mark next to the appropriate field. The workflow can only be completed as soon as the user responsible for it has saved his user password.
Password required
Put a tick next to the corresponding field and save a password. The workflow can only be completed as soon as the responsible user has entered this password.
Responsibility and due date:
In the first step, enter the person responsible for the workflow. By clicking on the selection list, you can assign specific users and / or entire departments with the workflow.
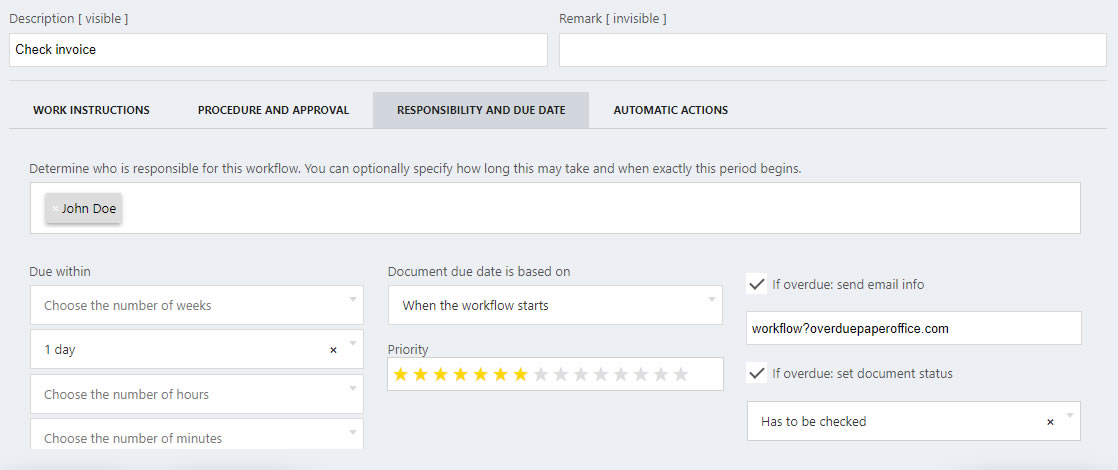
Due within
Under the description "Due within" you can specify different due periods by clicking the selection list. You have the option of defining the due date with the number of weeks, days, hours and minutes.
Document Due Date is based on
This field relates to the due dates, which must be preselected on the left under the same tab.
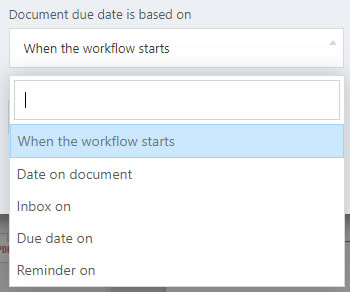
Here you can choose:
- "When the workflow is started". If you choose this entry, the workflow is due after the specified due period AB workflow start.
The workflow start is activated by assigning the workflow to the document and saving the changes.
- "Date on the document". If you select this entry, the workflow is due after the specified due period from the date on the document.
The date on the document can be set under the second tab of the document properties and read out automatically thanks to PIA.
Please note that the document properties field "Date on document" MUST contain dates so that the workflow can be executed.
- "Inbox on". If you select this entry, the workflow is due after the specified due period from the date of receipt of the mail.
The incoming mail date can be set under the second tab of the document properties.
Please note that the document properties field "Inbox on" MUST have dates so that the workflow can be executed.
- "Due on". If you select this entry, the workflow is due after the expiry of the specified due period AB on the document due date entered.
The due date can be set under the second tab of the document properties.
Please note that the document properties field "Due on" MUST contain dates so that the workflow can be executed.
- "Resubmission on". If you select this entry, the workflow is due after the specified due period AB and the date of the document resubmission entered.
The resubmission date can be set under the second tab of the document properties.
Please note that the document properties field "Follow-up on" MUST have dates so that the workflow can be executed.
Priority
Set the priority level for your workflow here. This is displayed in the workflow dialog.
If overdue: send email info
Check the box here and store an email address in the next area if you want to send a notification in the form of an email to a person if the workflow is overdue.
Check the box here and select a document status from the selection list if you want to request a status change if the workflow is overdue.
Automatic actions:
Under the tab, define various "automatic actions" which should be carried out as soon as the current workflow is triggered by various actions.
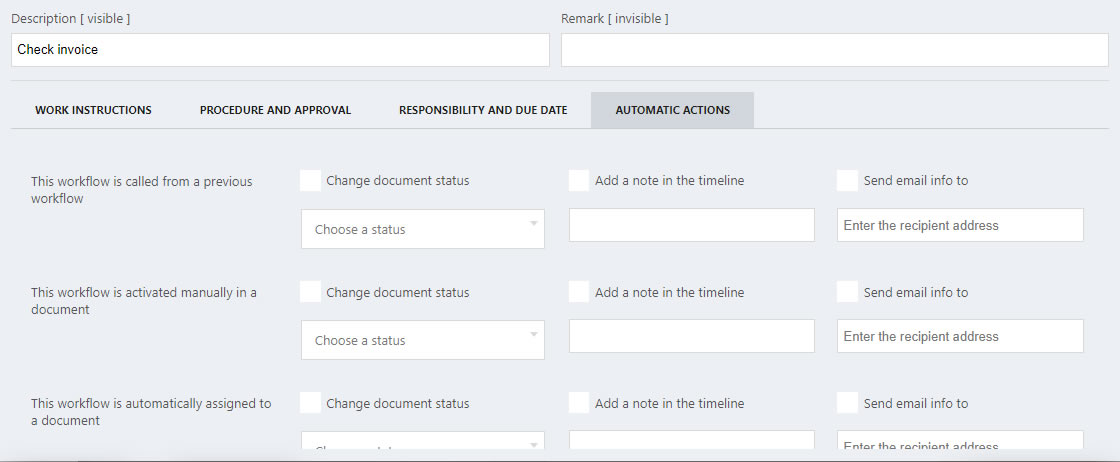
Here you can automatically change the document status, add a specific note to the timeline or send email info to a specific email address if you check the corresponding entries in addition to the following actions:
- This workflow is activated by another workflow
- This workflow is manually assigned to a document
- This workflow is automatically assigned to a document
- The workflow has been completed
Save your entry by clicking on "Save current entry".
Of course you can cancel the process by clicking on "Cancel", your entry will not be saved.
Delete existing entry:
Select the entry you want to delete and click on it in the management table.
Then click on the lower button "Delete selected entry" to delete it and then confirm the security question with "Yes, delete and remove".
Search for entries:
You can search for entries that have already been created within the administration mask by clicking on the right, next to the lens icon,
enter the term you are looking for. A live search of your entries is carried out.
The search is carried out for all entry data, such as the description, comment, user name and the date.